Multiple Gtalk Login – Chat on Gtalk With More Than One ID

Wednesday, June 24, 2009

Google Talk is one of my favourite online messengers. But like other web messengers it does not allow to use more than one user ID and chat using both user IDs at the same time. You have to use one Gtalk user ID at a time, sign out and then login with another user ID. Since I have two Gtalk user names, I was always looking to get logged in with my two user names at the same time. And finally I found a trick to use multiple Gtalk IDs at the same time. You can open two Gtalk messengers, login with two different IDs and talk at the same time from a single computer.


~: Follow the below steps to login to multiple Gtalk usenames :~


1. Go to your desktop and right click on Google Talk shortcut icon.
2. You can see the target path as “c:\Program Files\Google\Google Talk\googletalk.exe
3. Simply add /nomutex at the end of that path.
4. Final Gtalk path should be “c:\program files\google\google talk\googletalk.exe” /nomutex
5. Now you can click on this Gtalk shortcut on your desktop as many times as you want. Each time you click on it, it will open a new window and will allow you to login with different login names at the same time.
6. You are done.

If you don’t have a Gtalk shortcut on your desktop, but want to do this Gtalk trick, you can navigate Right click on your desktop >> New >> Shortcut. Type “c:\program files\google\google talk\googletalk.exe” /nomutex in the shortcut field, and it will automatically make an multi login Gtalk username for you.

That’s it. Now you can use Gtalk client to login with multiple user names. You can also find who is invisible, offline or blocked you on Gtalk.


(From: Solid Blogger)

Check If Someone is Invisible, Offline Or Blocked You On GTalk

GTalk is one of the most used messaging services on internet. People love GTalk because it’s easy to use and light. GTalk does not use much resources of your system. It’s fast and easy to get installed. And above all, it can integrate all your Gmail and Orkut contacts in one place and that’s why GTalk is getting more popular day by day. After all it’s a Google product, hence it should be also.

Initially Gtalk was not having any invisible option in it. Which means you will get noticed by all your friends once you log in. But later, after a lots of requests from it’s users, GTalk decided to start this invisible feature. But, they started this invisible feature for those who uses GTalk from GMail or Orkut. If you are using GTalk from your desktop, you may not get this facility.
In this post I will guide you with three things that you might find interesting. You can consider these as GTalk tricks. And the three things are:

1. How to know if someone is invisible on GTalk.
2. How to know if someone is offline or not.
3. How to know if someone has blocked you on Gtalk or not.
Lets get started step by step. I am sure, you will have fun reading these Gtalk tricks.
How To Know if Someone is Invisible or Offline on GTalk
People activate this invisible feature for many reasons. They might be busy or do not want anyone to disturb them. They want to chat with few people they want or they want to stay hidden and contact the persons they wish. I always stay invisible on Gtalk, so that I can talk with the persons I want

Now if you want to fool the people and know about their online status even when they have logged in with invisible feature activated, then this is possible. Poor Gtalk! There are two ways to do this.

• You need to have a GPRS enabled mobile handset.
• Download a free software called
gotalkmobile on your handset and install it.
• After the installation, log on to your GTalk account with your login details.
• Now, this will show you the entire online friends list. It does not matter if they are online or invisible.
• In this way you can catch your offline friends as well. The persons who are being shown as offline, are not present on GTalk.
• And you are done above. You will notice those online (visible + invisible) as well as the offline friends.
And the second method is:

• Set the chat as off the record with target user. This can be done only when the other user is online.
• Now try sending chat to that user when he is invisible or offline.
• If he is invisible, then he will receive chat.
• But if he Is offline, then you will receive error “ did not receive your chat”.

How to Know if Someone Has Blocked You on Gtalk :
Now this is worth exciting. Few times we notice friends not contacting us for a long time. Even though we send them messages, they never reply us back. It can happen because of three reasons.

1. He/She is avoiding you. (Are you that much notorious?)
2. He/She is offline since a long! (This is a busy world, really!)
3. He/she blocked you on GTalk! (He/she did not find a friend in you!)

Whatever the reson may be, it’s nice to find the reason yourself. Let’s find out the exact reason of not getting a reply back. But for this you need to have PIDGIN and configure it properly. Pidgin is a third party tool, available for free. You can use all your messenger accounts at once using this software. You can talk to your friends using AIM, ICQ, Jabber/XMPP, MSN Messenger, Yahoo!, Google Talk, Bonjour, Gadu-Gadu, IRC, Novell GroupWise Messenger, QQ, Lotus Sametime, SILC, SIMPLE, MySpaceIM, Zephyr etc. Read the below steps properly.
How to configure PIDGIN for GTalk
• Download Pidgin.
• Go To Accounts –> Manage –> Add.
• It will open a new window Add Accounts.
• From the drop down box choose XMPP as the Protocol.
• In case of Screen name enter your Gmail Id (e.g. – solid.blogger).
• Type gmail.com as the Domain/Server.
• In Resource Field enter Home.
• Type your Gmail Password in the Password Field.
• Choose any Nickname (e.g. – Bapun) as Local alias.

And you are done with Pidgin settings. Now lets play with Pidgin to find those GTalk contacts who has blocked you. For this follow the below mentioned steps.

1. sign in to GTalk on PIDGIN with your details
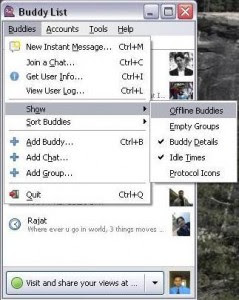
2. Go to Buddies –> Show Offline Buddies (The person who has blocked you is being shown as offline to you. So, in this way you can catch him.)
3. Now all available contacts will be visible to you. Select any one contact from that list.
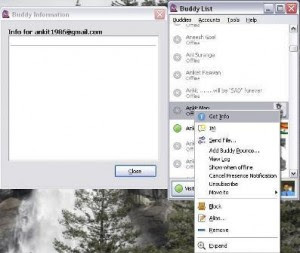
4. Right click on that selected contact, and click on Get Info.
5. Now here is the twist. Clicking on Get Info will show the brief profile of the person. But now if the person has blocked you on Google Talk, you won’t be able to see his/her full profile. You can’t even see his/her profile name.
This is the best way to know if someone has blocked you on google talk or not. If he has blocked you, then he will appear to you forever. I guess this the best way to find the person who is either offline or invisible or has blocked you on google talk. Also read How To Use Gtalk In Firefox Sidebar.


(From: Solid Bloggr)

How To Use Gtalk In Firefox Sidebar

Gtalk is one of the widely used online messaging service. We connect with our friends and talk with them using Google talk. But you need to have it installed on your computer to use it from your desktop else you need to use Gmail for this. But did you know that you can start using Gtalk from your firefox browser it self? Yes, now you can use Gtalk client for firefox to use it in your firefox sidebar. Lets know how.

1. Add the below link (just below this line) to your bookmarks. (Right click >> Bookmark This Link)
2. Move to your Bookmarks tab in your browser and locate this bookmark. Click on it’s Properties and then check the option saying Load this bookmark in the sidebar.
3. Now again move to Bookmarks tab on your browser and click on this bookmark.
4. That’s it. You can see the Google Talk (Gtalk) in your Firefox sidebar.
5.Sign in to your Gtalk account and start talking with your Google friends.
Check out the screenshot of Gtalk running in Firefox sidebar :

(Click on the image to enlarge)

There are several Firefox plugins available today to integrate Gtalk with Firefox. You can also use them to run Gtalk and Firefox simultaneously in Firefox browser only.

1.
Gtalk Sidebar : No need to download Gtalk. No need to use Gatlk from Gmail. Start using Gtalk from your Firefox browser itself by using this Firefox plugin.

2.
iGtalk : This is a very small plugin from the Mozilla house. Download and install it. After installation press Ctrl+G to start using Gtalk from your firefox browser.
Either use the above mentioned bookmarking procedure or firefox plugins to use Gtalk in Firefox sidebars. Also, do you know that you can find who is online, offline, invisible (online but appears offline) or blocked you on Gtalk? Then check if someone is offline, invisible or blocked you on Gtalk.


(From: Solid Blogger)

Auto Translate Any Foreign Language to All Languages with Nice Translator

Monday, June 22, 2009

If you need to translate any unknown foreign language to any other language and that to quickly, you need to have a professional online translator tool. Google Translate is one of the better online translation tools that provides accurate translation of any given language. The only problem with Google translation is that you can view the translated webpage or lines in one language at a time. But here is an another online translation tool that will re-translate your typed words in up to 34 different languages. It’s Nice Translator. It uses AJAX feature that keeps translating your words into other languages as you type.

Nice Translator is a web based free translation service. It supports 34 foreign languages including Chinese, German, English, Indonesian, Finnish, Portuguese etc. All you have to do is type the words or copy the words from somewhere and paste it in the given box. Nice Translator will automatically detect the language and will translate that into different languages as you type. It displays all translated languages in the below box.

This free online translation service can be really useful when you want to know the actual language of a word and then translate it to other languages at a time.


(From: Solidd Blogger)

Remove Duplicate Files from Your Computer with Fast Duplicate File Finder

Friday, June 19, 2009

Many times we end up keeping the same file in various drives of our computer. As a result, one file takes two or three times of it’s original space and eats of our disk space memory. In order to keep our hard drive cleaned from duplicate files, we need to keep the original one and delete the duplicate ones. But it will be a nightmare if we plan to delete them one by one, especially when you have a lots of data stored in your hard disk. At this point of time, Fast duplicate file finder will work like a charm. Fast duplicate file finder is a freeware, light, works efficiently and removes duplicate files from your computer within minutes.

Once installed, you can start it by double clicking on it’s icon. Unlike any other messy duplicate file finder tools, it’s having a smart, simple and easy to work interface and all you have to do is select folders where you want to check for duplicate files. You also have options like ’scan sub folder’, ’scan hidden files’ etc. Once fast duplicate file finder scans your folders or drives, it will show you the list of duplicate files with a preview button next to it. You can preview both files before removing either of them.
Fast duplicate file finder is compatible with all windows OS and sized about 1.6MB.
Download fast duplicate file finder and clean up your disk space by removing or deleting duplicate files from your computer.


(From: Solid Blogger)

Tips to Increase Your Mobile Phone Battery Standby Time

If you are facing problems like low battery stand by time with your mobile phone, you should look out for tricks to boost up or increase battery stand by time to use your mobile for a longer period without charging it frequently. There are a lots of hidden mobile phone settings that we most are unaware of and this post will tell the trick to increase battery stand by time and get a decent battery backup on all Sony Ericsson mobile phones. You might have noticed a blue triangular icon on the top left of your mobile phone display. Switching it on or off will affect your mobile phone stand by time. Let’s increase mobile phone stand by time using this feature.

On the top left hand side of your mobile display you can notice the network
strength indicator. Just next to it, you can see a blue triangular shaped icon. This icon is your ‘online status’ indicator. This is required if you want to stay connected to internet. If you are not connected to internet presently, you should turn it off. Keeping this switched on all the time will eat up your battery time, resulting in bad stand by time.

Navigate to Menu >> Settings >> Connectivity >> Data Communication >> Preferred Service >> Select CS Only.

Generally you get two options under Preferred Services menu. One is PS (Packet Switch Data) and CS (Circuit Switch Data). Selecting CS Only will increase your network connection establishing time by 5-6 seconds only, but will increase your battery stand by time by 20-40 minutes. Waiting for 5-6 seconds will be fine in comparison to loosing 20-40 minutes battery stand by time, isn’t that?


(From: Solidd Blogger)

Trick to Find Name, Location or Address of Any Mobile phone Number

Thursday, June 18, 2009

We can use telephone directories or call telephone help center to find the name, address or location of any landline number. But as far as mobile phone numbers are concerned, TRAI (Telephone Regulatory Authority of India) made it very secure and instructed all mobile phone operators not to reveal any mobile number informations related to user’s identification. It used to be almost impossible to track or trace any mobile number to find the owner, location or address details. But finally there are web services to help us in getting these top level personal informations. This technology is called Reverse phone Lookup.

All you have to do is get the mobile number and enter it. Reverse phone lookup site will automatically search for the informations related with that number and will display the complete
of that number. This service is completely free. You can refer to this, this, this, this, this or this site tolookup any mobile phone informations.

However, keeping the privacy of people in eye, these sites should get banned. Mobile phones are known as private gadget and the informations related to the user should not be available to public. But since these sites offer mobile phone user informations, you can feel free to
trace any mobile phone location, address details, name etc and that to legally.


(From: Solid Blogger)

How to Trace a Mobile Phone Location online

Previously i have written a post on how to track a mobile phone number in India online. Tracking mobile phone number will tell the state, network of that mobile phone number. But now you can track the exact location of a mobile phone online. Using Google Latitude, we can track the current location of the mobile holder. This will give us an accurate information of the mobile holder as Google Latitude tracks the mobile signal and other details.

You can find the detailed post on how to trace a mobile phone location online here.


(From: Solid Blogger)

Block Website Ads on Opera 10 with AdBlock+

Advertisements on websites are the only way for the webmasters to run the site. If they won’t run the ads and won’t get any money out of their websites, all time and hard work will go wasted. But since user experience comes first, I would recommended you a inbuilt option to block website ads on Opera 10 browser. Even Kaspersky internet security can block webpage ads, but since Adblock+ is a special designed inbuilt option for Opera 10, I would recommended you to try this. This will block ads from many leading advertisers and will give you the freedom to experience ad free web pages.

How to Block Ads Using AdBlock+ on Opera 10

1. Open your Opera browser.
2. Navigate to Tools >> Advanced >> Blocked Content

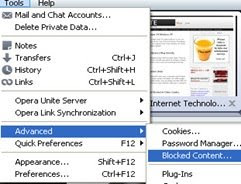
3. Now a dialog box will pop up. Simply add the list of Ad source pages and save it.
4. Restart Opera 10 and you are done.

Now you won’t see any ads from those ad networks. Since many users don’t know about ad networks, here is the list of some top ad network ad sources. You can add these sites to your blocked list and enjoy ad free browsing on Opera 10.

http://pagead2.googlesyndication.com/*
http://ad.*
http://ads.*
http://adserv*
http://imgserv.ad*
http://*.ads.*
http://*/ads/*
http://*banner*
http://*Banner*
http://*bharatstudent*
http://*yieldmanager*
http://*admanager*
http://*cpxinteractive*
http://count*
http://*linkexchange*
http://*.doubleclick.net/*
http://*.fastclick.net/*
http://*.burstnet.com/*
http://*kontera.com/*
http://*infolinks.com/*

You have to add the above sites one by one manually. If you ever see ads from any different ad network, check that page’s source code by pressing Ctrl+U to locate the URL of that ad, add that site’s link to your blocked list and those ads will get disappeared. This is the best way to block website or webpage ads on Opera 10.


(From: Solid Blogger)

Trick to Extract Text or Notes from Images

If you have got a picture with a quotation and want to save the quotation text from it for later reference, you have to manually write down those text in a notepad file. But if you have a large number of image files to save the quotations from or the quotations are relatively longer, it will be a nightmare. At this point you can use a software to extract text or notes from a image file and save it as text only. Tools that can extract text from an image are powered by OCR (Optical Character Recognition) technology. These tools support most image file formats like JPEG, BMP, PNG etc.

OCR technology converts images to computer understandable format. After the conversion, your computer will try to recognize the part of images that have text or other elements. After the recognition, it will read the text part and will extract that for your use.

All tools with OCR concept comes with a high price tag. Since it needs a lots of time, testing and development expenditures, companies are not willing to release these products as freewares. Two of those tools that can
extract text from images are ABBYY FineReader, Time Snapper etc. You can also check for OCR plugins for your existing image editing tools, if available.

However, there is a free online OCR service to extract text from images online. It’s called
Free-OCR. You can upload the images online and this online tool will tell you the written text on that image after leeching it from your image.


(From: Solid Blogger)

How To Extract and Save Images From PowerPoint Files


If you have received a PowerPoint presentation or PowerPoint slide show file and find few awesome pictures inside it, you would love to extract and save those images on your computer. But by default, there is not any such option on PowerPoint to extract and save images on your computer. So, how can you save PowerPoint images on your computer?

Below I am giving few easy and quick steps to extract and save images from PowerPoint files.

Using PrintScreen Option :

1. Open your PowerPoint presentation file and navigate to that image page.
2. Hit “PrintScreen” key on your keyboard (Doing this will store the screenshot of your desktop as an image file)
3. Open any image editing tool like Photoshop, Microsoft Paint etc and paste the image from the clipboard.
4. Use image croping feature to delete the unnecessary parts from that image.
5. Save the image and you are done.

But if you are having a lots of images to work with, this will be a headache. You can’t even think of using PrintScreen option for extracting more than 10 images. It’s very time consuming and the quality will not be that good.

Using Exporting to HTML option :

1. Open your PowerPoint file
2. Navigate to File >> Save As and save the file as Web page(*.html, *.htm). [choose this option from "Save as Type" option.]
3. Now move to the location where you have saved that HTML file and you can locate a folder called Pics_files (I assume you saved the file as Pics.html).
4. You can find the image in that folder.
5. You are done.

Now I guess you won’t have any problem in extracting images and saving images from PowerPoint presentations on your computer. If you face any problem, feel free to contact me.


(From: Solid Blogger)

How To Make Your Computer Booting Time Faster

Saturday, June 13, 2009

Is your computer taking too much time for booting process? Well, you can never expect a computer to act like a television set, where you plug in and there you go. A PC is dependent on several things and after getting green signal from all those components and gathering all required informations, it starts. Now if you want to make your computer boot time faster, you should concertate on making several other things faster and as a result your computer booting time will get changed dramatically.

In general older systems tend to have a slower booting time. With time processor, RAM (Random Access Memory), OS (Operating System) gets slower and and takes time to wake up. We can’t change their ages, but yes, we can of course do something to make energetic. Here are some tips to make your computer younger.

How To Make Your Computer Booting Time Faster :
Remove all unwanted programs from your PC : There are several programs on our PC that we don’t use anymore. Now if they are not coming in our use, why should we keep them installed? Remove all unused applications from your system to make it faster.

Use latest updated Antivirus : Few times we trust our antivirus so much that we really forget to get it updated. If you don’t update your antivirus, it would be a wise idea to remove that from your system as it can’t catch any newly released virus and having virus, malwares in your PC will make it’s booting time slower. It’s all related.

Choose your operating system wisely : Surveys confirm that systems with Windows Vista takes more time to reboot. Yes, Vista OS takes more time for booting than Windows XP. You really can’t do much about this but from the next time choose your OS according to it’s performance, not style.

Keep your registry files cleaned : This is one of those most important factors. If your registry files are not clean or changed with different values, your computer will not only take more boot time, but it will also perform abnormally. So, it’s better to get a powerful registry editor for your computer. You might consider using Registry Victor. Download Registry Victor. I would recommended to buy it’s full version, it’s worth that.

Following the above steps will decrease your computer boot time and you will be able to make your computer faster than ever.


(From: Solid Blogger)

Trick to Open or Load Firefox Faster During Start Up

If your Firefox browser takes more time to open, you can tweak it to load and open faster. Firefox takes a bit more time to load and open as it goes through several processes before opening. Firefox loads all dll files, collects informations about plugin updates, loads all plugins and then starts. processing all above operations takes time and you have to wait until it goes through all of them and gets started. If you want to load firefox faster, you have to minimize the processes so that it would take minimal time during start up. Let’s know how to make Firefox start up faster.
1. Download UPX file.
2. Extract upx.exe file in your Firefox installation folder. In most cases it should be C:\Program Files\Mozilla Firefox
3. Close Firefox browser. Shell a command prompt in firefox installation directory. Type the following code in the command prompt and hit Enter.

for %v in (*.exe *.dll components\*.dll plugins\*.dll) do upx “C:\Program Files\Mozilla Firefox\%v”

4. The above command prompt code will compress your .dll files. In case you need to decompress them in future, you can type the following code in command prompt and hit enter.

for %v in (*.exe *.dll components\*.dll plugins\*.dll) do upx-d “C:\Program Files\Mozilla Firefox\%v”

That’s it. Now you have compressed all Mozilla Firefox .dll files and as a result your Firefox browser will open faster during start up. There are also some other ways to speed up Firefox, I will post about them later.


(From: Solid Blogger)

Hacking Yahoo Messenger To Find IP Addresses!

Friday, June 12, 2009

Earn Money
Hacking Yahoo Messenger is all about using some tricks to track and find out anyone’s IP address. We all chat with our friends or relatives using Yahoo messenger. This is very familiar with us. To respect everyone’s privacy, Yahoo messenger does not show us the IP address of those people we are talking with. But this is possible to apply some simple tricks to bypass yahoo’s security settings and hack anyone’s IP addresses. Lets discuss how.

Whenever we chat with someone, the whole process is controlled by Yahoo server. There is no way to hack Yahoo server, this is almost impossible. As we don’t communicate with the person directly using our own system or network, this is impossible to hack this encrypted IP source. So, we have to set up a direct connection with the person in order to track his IP address using Yahoo messenger. Simply send the person a big file (Not less than 3 MB) via Yahoo Messenger File Transfer. Once he accepts the file, his computer makes a direct connection with your computer for the file sharing process. And here we go.

Once both the IPs (Your’s & the Victim’s) get engaged in the file sharing process, it will take you a maximum of 2 minutes to track his IP address. Now it’s time to hack his IP address by following below steps. Remember, do not start file sharing from the beginning. Read the instructions carefully.

1. Go to Start –> Run (This will open your windows command prompt)
2. Type CMD and hit Enter
3. You will get a list of IP addresses like the below screen shot.

4. You can notice two columns as Local Address and Foreign Address there. Local address is your address while foreign address is the IP of the recipient with whom you are sharing the file.
5. Send him the 3 MB file (You can send him a small clip, zipped images etc)
6. Now type netstat -n in the command prompt
7. You will get a output. Suppose the following is the output.

TCP 129.11.25.10:5181 174.35.20.66:1646 ESTABLISHED

8. In the above one 174.35.20.66 is the IP address of that person and 1646 is the port no where the file transfer is taking place. You are done here.


Once you get a person’s IP address and port no, you can use any remote hacking tool to do anything. Also remember that, few times Yahoo transfers the file using it’s own server. In that case this trick won’t show effects. But hacking is illegal and I strongly encourage all my readers NOT to do this. Treat this post for educational purposes only.


(From: Solid Blogger)

How to Add or Insert Images into Gmail Messages

Gmail Lab feature is making Gmail experience better day by day. Earlier it was a bit difficult to insert or add images to Gmail message body. we had to attach the image first and then link them in the email body. But now we can insert images to our Gmail messages easily using Gmail Lab feature. All you need to do is enable and active enable images feature in your Gmail lab and you will get a button activated in your email compose toolbar. Simply use that button to insert any image from your computer.

How to activate Gmail Lab Feature To add images to Email Body :

1. Log in to your Gmail account.

2. Click on Settings tab. You can find it on the top right corner.

3 . Click on Labs tab.

4. Scroll down to search for a Lab feature called Inserting images.


5. Click on the Enable radio button to activate this feature.

6. You are done.

From now on you can see a image inserting button in your Gmail message compose toolbar. Click on that button to choose, select and insert images to your Gmail messages. isn’t that easy, huh


(From: Solid Blogger)

Track Anyone’s Location From Email’s IP Address On Gmail

Few times we search for people’s location from it’s email address. Well, it’s practically possible to track anyone’s location from email’s IP address. All popular email providers are supporting this feature. Most people want to track or trace the origin of suspicious emails or any threatening emails. By tracing the IP address you can find the location, state, country and even the phone no (not all the time). Here I will guide you to trace anyone’s location from it’s IP address on Gmail

Trace IP address of any mail on Gmail :

1. Just select any email and open it.
2. Click on the arrow link next to the Reply option and select Show original from the options.

3. Search for the line Received: from in the below code.


4. In the above example, the IP address is 202.168.89.74. Now we have to track the location of this IP address.

How to track any IP location :

After tracing the IP location from your Gmail, you can use any IP finder services to track the email location. You can use
Ip2Location or who.is services to trace Ip addresses

So, now pulling out someone’s IP address location from a Gmail email is not a problem. This feature will help your to protect your Gmail account from hackers.


(From: Solid Blogger)

How to Open Two Gmail Accounts at Once

Gmail allows everyone to create and use more than one account. You can have as many Gmail accounts as you want and can use all of them for your mailing purposes. But opening two Gmail accounts at once is not possible since Gmail uses cookie system. Once you open and login to a Gmail account, it automatically stores a cookie in your browser. The next time you try to open Gmail, it will track the cookie code and will open the previously opened Gmail account. In simple words, you have to sign out of one Gmail account to login with another. But we can bypass this limitation and open more than one Gmail account at the same time, without having any problem.


Let’s try to open more than one Gmail account with a simple trick. If you are using Firefox, Internet Explorer, Google Chrome, Apple Safari or any other web browser, try opening different Gmail accounts in those browsers separately. Opening different Gmail accounts on separate browsers won’t create any problem as long as you are not using any cookie sharing plugin. This is the easiest method to open two Gmail accounts at once.

If you don’t prefer using different browsers, you can get it done on firefox itself. Simply use a Firefox addon called IE tab.


IE Tab adds a instance of Internet Explorer tab on Firefox. Now you can open Gmail normally on Firefox and the right click to select to open IE tab. Once a IE tab is opened on Firefox, you can login to an another Gmail account there. You will have no problems in opening and using two Gmail accounts at the same time.


(From: Solid Blogger)

Convert any Image Format to PSD, Jpeg, Png, GIF with RentaSoft

Thursday, June 11, 2009

If you are looking for an image editing tool to convert images with any extension to PSD, JPEG, GIF, ICO or any similar extensions, you can try a freeware tool called RentaSoft. RentaSoft can easily convert your image files from one extension to other. It also has the feature to adjust image quality by either reducing or maintaing the quality level while converting it to any other format. You can also resize images to any size during this image format conversion.

RentaSoft Key Features :

► Convert images to PSD file format
► Image converter option in right click menu
► Quality and resize options
► Convert to several other formats such as Jpeg, PNG, GIF, ICO etc
► Absolutely free to use

Converting your files to .PSD extension makes you able to
edit your image file easily using Adbobe Photoshop. This will be helpful if you are trying to make a banner or logo for something. If you love to play with images, download RentaSoft to get images converted to several formats.


(From: Solid Blogger)

Know If A Photo or Video is Original Or Edited!

Can you identify if your image is original or edited? Perhaps the answer is NO. There are professionals who can edit pictures with tools like photoshop and make them look real. You certainly can’t recognize the originality of those images. Few times I get confused to know if the image I’m viewing is taken from a camera or a doctored image. Likewise there are video editors who edit and make the video look original. But finally there is a tool to tell us if the image or video is original or has been edited with any photo/video editing tools. It’s called JPEGsnoop.

JPEGsnoop is a powerful and witty tool that determines the actual origin of a photo or video. Do you know that every image or video contains some secret codes, called signature in it. JPEGsnoop is capable of reading those signatures. If the image or video has been captured with a camera, it will have some camera assigned signatures inside it. And now if the image or video has been doctored, it will have the signatures of those editing tools inside it.

JPEGsnoop analyze the signature code and try to match it with different photo/video editing tools. If the signature matches with any video or image editing tool’s compression signature, it will show that the image or video file has bee edited. If the source file contains the signature code found in the cameras only, it will label that file as original one. It’s a freeware, so download JPEGsnoop and be a image/video spy.

Look at the below screenshot.


JPEGsnoop found some editing work in the above screenshot. This tool comes loaded with signatures from different editing softwares. You can also update it for any latest signature availability. JPEGsnoop supports few popular file types such as JPG, AVI, DNG, MOV, PDF. It can also be used to repair or fix your corrupt images.
Download JPEGsnoop.


(From: Solid Blogger)

Resize Images Online Without Loosing Picture Quality

Online photo editing tools are getting more popular day by day. They are fast and better as they don’t ask you to install tools like Photoshop, Windows Paint etc on your PC. They don’t need you to have good hands in these photo editing tools also. Simply upload your image and you are done within few seconds. You can customize your images the way you want with add ons. Below I’m going to list few online image editing tools which can resize your images with the best quality possible.

QuickThumbnail : This site claims to be the fastest way to resize your pics and images online. You have to choose a image file, the resizing option and hit resize it. Then your image will get uploaded to their server, resized and you will be given that resized image maintaining the same quality as the original one.

SnipShot : This is an advanced online resizing tool. This will not only resize your pictures but it can also rotate your image, can corp your photo, can handle contrast, brightness, sharp and hue adjustments and allows you to perform unlimited Undo and Redos. You can upload and edit pictures with size upto 10 MB or 25 Megapixels (5000*5000 pixels). Even many pic editing tools get hanged when we try to edit such big files, but SnipShot just works fine.

DoSize : Select the images that you want to resize. Open the site and browse your picture from your computer. Select the size from the resizing option. Then the image will get resized automatically. Once the picture gets resized, you can even mail those pictures to your family and friends from their website.

Rsizr : This online photo resizer uses a flash application that allows you to resize JPEG, PNG and GIF images. This tool allows you to crop your images as you want. The most interesting thing about this site is that it uses a new image resizing algorithm called seam carving (a method of image retargeting) that tries to keep intact areas in your image that are richer in detail.

PicResize : Picresize is an advanced image resizing site. It not only resizes your pictures but can also enhance them in many ways. You can choose the height and width to edit, simultaneously you can add some special effects to your picture like Gaussian blur, gray scale, oil paint, sharpen etc. You can save the picture either in JPG, GIF or PNG format.

Now guess, after having such wonderful image editing sites, who is going to install large photo editing softwares on PC?


(From: Solid Blogger)

Doing Wordpress SEO? Try HeadSpace2 SEO Plugin

Wordpress blogs are feature rich and can be improved further using Wordpress plugins. Wordpress plugins are used to improve the quality, performance, look and management of your blog. There are thousands of plugins available today to install and try on your blog, but remember that installing unnecessary plugins might affect your blog’s performance. So, it’s better to choose plugins wisely, else that will work as a negative factor for your blog. Here is my 12 must have Wordpress plugins guide for every Wordpress blogger. Remember that these are not optional, they are mandatory. Get them or die, choice is yours.
1.
Akismet : Akismet is one of the two plugins that come bundled with Wordpress set up file, all you need is to activate Akismet with API key. Akismet filters all spam comments on your blog, making Wordpress comments management way easier.

2.
All-in-one SEO Pack : Having a blog with decent no of posts is not enough, you have to optimize your blog for search engines also. All-in-one SEO pack plugin takes care of meta tags, keywords, descriptions, index or noindex tags on your blog. This is the most essential plugin to make your blog stand well in search engine results. You can also try an another similar Wordpress SEO plugin called HeadSpace2 SEO plugin.

3.
Google XML Sitemap Generator : Google XML Sitemap Generator plugin creates a sitemap of your blog and rebuilds it automatically when you edit or add a new post (check plugin settings). Submit the sitemap created by this plugin to search engines for better indexing of your blog posts and pages.

4.
Super Archive : This plugin creates an archive page for your Wordpress blog. Archive page contains all your blog posts and pages in one single page. Blog visitors like to see the list of all your contents in one single place while search engine spiders would love to treat this as your sitemap.

5.
WP Contact Form : WP Contact Form creates a contact us page in your blog. Your blog visitors can use this form to contact you. This plugin sends your visitor notes to you by email.

6.
Wordpress Related Posts : This plugin shows the list of related posts on the bottom of your blog posts. This is the best way to show posts related with the article. This affects your blog SEO and page views in a positive manner also.

7.
WP Super Cache : While opening a blog post, core Wordpress set up and installed plugins run queries and then serve the page and running several queries increase page load time. WP Super Cache eliminates this problem by caching your blog pages and serving them as HTML formatted files upon request. This is essential to make your Wordpress blog faster.

8.
Ping Optimizer : Wordpress blogs are coded to send pings to search engines when you edit a post or publish new ones. If you are editing your posts or making new posts too often, your blog will send continuous pings to ping servers. Sending maximum pings will get your blog banned from ping servers and this will make your blogging career hell. Use ping optimizer to limit your pings, you can set the time interval between new pings or set it to ping for new posts only from the plugin’s settings page.

9.
Broken Link Checker : We give many outbound links from our blog posts. But with the source of time, few of those links gets broken and shows a 404 page. Linking to 404 (Not Found) pages from your blog will affect your SEO factor. Use Broken Link Checker plugin to find out any invalid or 404 links from your blog.

10.
Global Translator : We all try to blog quality posts to attract more visitors. If this is the case, then we should allow people from any countries to read our blog posts in their own language. Adding WP Global translator will show flags of different countries on your blog and upon clicking on those flags, your blog page will get translated to the respective country’s language instantly.

11.
Nofollow Reciprocity : We often give links to other blog posts or websites for different purposes. Wordpress automatically adds a dofollow tag to the links inside the post. Giving dofollow attributes to a link acts like a linkback and this will make your post appear lower in search engine results. Use Nofollow Reciprocity plugin to add nofollow attribute to all outbound links from your blog automatically.

12.
StatPress Reloaded : Keep the track of your blog visitors to know what they like and what they don’t on your blog. StatPress Reloaded plugin shows you the trend of your blog traffic with graphic charts and detailed view. You can see your traffic statistics easily on your blog without using Google analytics with this plugin.


(From: Solid Blogger)

How to Get a Wordpress API Key to Activate Akismet Plugin

Akismet is one of the plugins that every wordpress blogger use. Aksimet is free, regularly updated, comes inbuilt with Wordpress set up file and works like a charm. Once installed, Akismet keeps a close look on all comments made on your blog and if it suspects anything suspicious, it marks them as spam and send to the spam folder. But many new users get confused when they try to activate Akismet and it asks for a API key to get activated. Don’t worry, API key for Akismet plugin comes for free and it takes just a minute to generate your unique Wordpress API key.
Remember that unless and until you get a wordpress API key, Akismet spam feature won’t work on your blog. However you can generate one Akismet key and use that on all your blogs to activate Akismet.

How to Activate Akismet

1. Navigate to Wordpress and sign up for a free account.
2. When asked, select the second option - "Just a username, please."


3. After successful registration, Wordpress will send a verification email to your email. Remember to provide actual email address.
4. Open that email and scroll down to find Wordpress.com API key. It looks like the below screenshot.
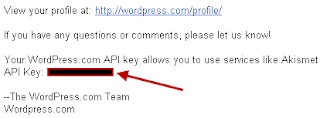
5. Copy that API key and paste in your Akismet API Key field. Click on Update.
Now you have got your Akismet plugin successfully verified.
6. You are done.

Remember to keep that email safe. You might need that API key no to verify Akismet on other Wordpress blogs as well. Thanks to
Hacktrix for this lovely tutorial.


(From: Solid Blogger)

Import, Export and Synchronize Bookmarks Between Different Browsers with Transmute Portable

If you are using different web browsers on your computer, you must have been facing the problem with synchronizing the bookmarks between all browsers. Supposes you have bookmarked a website on Firefox, now you can’t see or use that bookmark on any other web browser. So here is the new bookmark manager to import, export and synchronize all bookmarks among the browsers you have. Transmute portable supports bookmark synchronization between browsers like Mozilla Firefox, Opera, Internet Explorer, Safari and Google Chrome.


Key features of Transmute Portable

1. You can import and export bookmarks between all web browsers
2. Easy surface to operate and manage bookmarks
3. Import and Export bookmarks with just one single click
4. Ability to add new bookmarks instead of replacing old ones
5. Backup option to keep your backups securely

If you bookmark sites frequently for later reference and use random web browsers to access internet, Transmute portable will help you in accessing different browser’s bookmarks in all installed browser.
Download Transmute portable


(From: Solid Blogger)

Backup Or Transfer Google Chrome Bookmarks

This feels very sad to loose our internet browser bookmarks due to system crash or something. We have different browser plugins available today to keep a back up of our bookmarks online. But there are no such plugins available for Google chrome. And also chrome is not supporting the bookmark export feature to another browser presently. Here, I will guide you with the steps to take a backup of your Google chrome bookmarks. Then you can either save the back up on your computer or can transfer that to somewhere.

Save Google Chrome Bookmarks:

We will apply some tweaks here. As Google chrome is not have any bookmarks export feature, we have to transfer chrome bookmarks to either Firefox or Internet explorer and save from there. And after the successful transfer of the bookmarks we can now save the bookmarks or transfer that via flash drives etc.

For this follow the below steps:

1. Open Google Chrome and navigate to Settings >> Bookmark Manager
2. From the Bookmarks Manager menu navigate to Tools >> Export Bookmarks
3.Save the file on your hard disk and you are done.

Now you can open that exported bookmarks file with firefox or internet explorer. So, backing up, saving or transferring Google chrome bookmarks is not a problem anymore.

(From: Solid Blogger)

Create Single Shortcut To Launch Multiple Programs On Your Computer

Wednesday, June 10, 2009

We use computer very frequently in our day to day life. And while using computer, we use few programs frequently. If we have to run and use these programs, we start them one by one by clicking on their shortcuts. So, how about creating a single shortcut which will start all your favorite programs at once? This will save your time and get your job done easily. Lets discuss how to do this.

This computer trick can be done in two ways. We can either do some manual settings (geeky way) or can take help of third party softwares. We will learn both ways. But lets start with the manual way to create shortcut to launch multiple programs on your computer.

1. Open Notepad. Go to Start >> All Programs >> Accessories >> Notepad
2. Enter path to each program you want to run in the notepad. Remember to make new lines for new programs, i.e. press Enter after one program, then write the second program, hit Enter to make a new line and then write the third program and so on.
3. While writing paths to new programs, put Start “” before each program. Remember to write Start, give a space, then write “” and again give a space, now write the path to the program. Refer to the below screen shot.

TIP : Here I’m telling you the easiest way to get the shortcuts for your favourite programs.

a. Right click on a program’s shortcut on your desktop
b. Go to Properties
c. Here the Target Path is the short cut to that program
d. Copy that Target path
e. And you are done with the path of your program.

4. Now the basic syntax for each file will look like start “” “application path”
For an example start “” “C:\Program Files\Real\RealPlayer\realplay.exe”
5. Now save the file as single.bat or you may go creative. You can also save it as SolidBlogger.bat. But remember to give the file a .bat extension otherwise it won’t work.
6. You are done now. Save that file on your desktop. Whenever you want to start those programs, click on this .bat file and all those programs will get started automatically.

It was the geeky way. Now if you are not willing to do all these manually, you can get a third party freeware tool called
Utility Launcher. It’s Layman’s method to create single shortcut to launch multiple programs. Lets know how to do this using Utility Launcher.

You can open up to 20 applications with this tool. Utility Launcher will open all programs automatically once you start utility launcher.


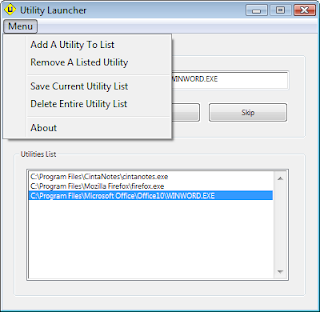
This is not a one click treatment to open all your desired programs. But this is an useful tool which can open up to 20 favourite and most used applications. You need a maximum of two clicks to launch multiple applications. Download Utility Launcher.

Now you don’t need to worry about opening all your favourite messneger services one by one. One simple click will start and launch your favourite programs.


(From: Solid Blogger)

Download Unlimited Rapidshare Files without Premium Account Trick


Rapidshare, one of the largest file hosting and sharing network allows unlimited files downloading to it’s premium users only. It uses a auto capping feature to keep normal users away from downloading more than one file at a time. Additionally you have to wait for few minutes to download next files after the completion of current one. Again if you want to enjoy all features like no waiting time, higher speed and parallel downloading, you need to buy a premium account. Here I will share the trick to download unlimited files from Rapidshare instantly without having a premium account.

To restrict a normal user from downloading files continuously, Rapidshare logs each IP address. Every time you start downloading files fromRapidshare, it logs your IP address. Once you download a file, it registers download quota with your IP address and when you try to download another file, it will check that log file for your previous downloads on that IP. If it finds that you have downloaded a file recently, it will ask you to wait for some more time before you can download another file. In this case you can use
Rapidshare download accelerators or do some tweaks on your computer to bypass Rapidshare waiting time.

How to bypass Rapidshare Waiting Time Limit and Download Files

Each time you open your computer and connect to internet, your ISP assigns a IP address to your computer. This IP address might change on each system restart if your ISP provides dynamic IP service. Since, Rapidshare looks for IP address to track previous downloading history, we can resume unlimited download if we reset our earlier IP and get a new one. Let’s know how can we reset previous IP address to get a new one.

1. Go to Start >> Run on your computer.
2. Type cmd in the run box.
3. It will open Command Prompt window. Type the following commands there one by one, (don’t forget to hit Enter after each command) in the given order.
"@ECHO OFF
ipconfig /release
ipconfig /flushdns
ipconfig /setclassid
ipconfig /registerdns
ipconfig /renew
EXIT


4. Now your computer should have got registered with a new IP address.
5. Navigate to Rapidshare and try downloading your file. This time you would be able to download files, even if you did download large files few minutes before.
6. Repeat the above process each time you want to download files from Rapidshare.
7. You are done.

This above trick is simple and does not need much expertise. Copy the above command prompt commands to a notepad file, so that you can follow them easily next time. If you face any problems in performing the above trick, write here in the comments section and I will be glad to assist you further.

(From: Solid Blogger)